Six minute spicy chicken and rice

IMG_2408

This is a pressured cook’s dream meal, with a total pressure-cooking time of six minutes. The amount of preparation is up to you: I cheated and bought a pre-marinated, butterflied (split) free range chicken, but you can start from scratch. Simply brush your chook with a good quality olive oil, and sprinkle with chilli and any other spices that take your fancy and let sit in the fridge for as much time as you’ve got up your sleeve.

Six minute spicy chicken and rice

1 chilli-marinated butterflied (split) chicken (free range)
1 onion, chopped
2 cloves garlic
1 cup long grain rice (I prefer basmati)
1 red capsicum, finely sliced
1 1/4 cups chicken stock
1/2 cup white wine
pinch real saffron threads (0r half teaspoon turmeric)
1 cup frozen peas
oil, for frying

  1. fry the onion and garlic in some oil in the pressure cooker, add the chicken and quickly brown all over.
  2. remove chicken from pressure cooker.
  3. add the rice, wine, stock, capsicum and saffron to the pressure cooker and give a quick stir.
  4. place the chicken on top of the rice and put the peas on top.
  5. cook on high pressure for six minutes.
  6. use the natural release method and serve.


Posted in Uncategorized | Tagged , , , , | Leave a comment

Pressure cooking tips

Any one new to pressure cooking, or thinking about venturing into the exciting, time-saving world of pressure cooking, should check out this site by Bernard.


Posted in Uncategorized | Leave a comment

Chilli con beans and potato

Baked potato

Having access to so much good quality, humanely-reared free range meat, I am conscious that we eat a lot of animal protein. As a result, I try to make every second meal vegetarian. This meal was very simple, cheap and super-tasty, and can be prepared quickly using tinned beans, or in my case, some beans that I had cooked and frozen a few weeks ago.

The most time consuming aspect is cooking the potatoes. I pressure cooked mine first, with a cup of water on high for 20 minutes and then placed them in a hot oven (220 degrees Celsius) while I was preparing the beans.

Serve with spring onions, and extras such as feta cheese and avocado. Yum!

Chilli con beans and potato
Serves 4-6

Large potatoes, skin on, scrubbed (allow 1 potato per person)
440 gm tinned beans* (I used white beans but virtually any legume will work e.g. borlotti, black-eyed, cannelloni, Spanish etc)
700ml jar of passata (or equivalent crushed tomatoes)
1 onion, chopped
1 clove garlic, crushed
1 stick celery, chopped
1 tbspn paprika
1tspn dried or fresh chilli
1 tspn dried thyme or sprig of fresh thyme
1 tspn sugar
salt and pepper
spring onions to garnish

  1. Make sure your potatoes are cooked before you start! If using the pressure cooker, put the potatoes in the bowl with 1 1/2 cups of water and cook on high for 20 minutes, then transfer to a hot oven while you prepare the beans.
  2. Fry the onion, garlic, paprika, chilli and celery in some oil until the onion is soft.
  3. Add the beans, passata, sugar and salt and pepper and cook on low pressure for 3 minutes.
  4. Roughly cut the tops of the potatoes and spoon over the beans, and some of the spring onion.
  5. Serve with feta cheese if desired.


Posted in Uncategorized | Tagged , , , , , , , | Leave a comment

Maple-soy pork Scotch fillet

Soy maple pork

There is nothing quite like truly free range pork. We have been lucky enough to discover Amber Creek Farm near Fish Creek, South Gippsland which sells pork from pigs that live their entire lives outdoors. It’s a great story, both from an animal welfare and environmental point of view, and I encourage you to check out their website (Amber Creek Farm) and/or their Facebook page.

In the meantime, this recipe might get you inspired to source your own free range pork. I used a 1kg piece of Scotch fillet, although any similarly sized piece of pork would work equally well. If possible, place the meat on a wire rack in the pressure cooker bowl so that it is above the cooking liquid. This prevents the meat from being poached, and allows you to retain a bit of the ‘roasty’ coating that develops when you sear the meat in the fry pan before pressure cooking.

I served this with fried cauliflower and peas, seasoned with sumac, cumin and lemon juice. Totally delicious!

Maple-soy pork Scotch fillet
(Serves 4-6)

1kg piece pork Scotch fillet
1/2 cup soy sauce
1/2 maple sauce
grated zest of an orange or a lemon
3/4 cup water
olive oil
handful of thinly chopped spring onion, to serve

1. mix together the marinade, using the soy sauce, maple syrup and zest. (It’s a good idea to taste it beforehand; some people prefer a sweeter marinade, so adjust accordingly.)

2. place the pork in a bowl and pour over the marinade.

3. marinate the pork for at least ten minutes. Turn it over a couple of times to make sure it is well covered by the marinade.

4. heat some oil in a fry pan and quickly sear the pork on all sides.

5. if you have a wire rack, place it in the pressure cooker. Put the pork on top of the wire rack and pour over the marinade, plus the water (you will need about 1 3/4 cup of liquid in total). Also, scrape in all the yummy bits and pieces from the fry pan to add extra flavour!

6. cook on high pressure for 20 minutes.

7. use the slow release method to finish. This is the equivalent of leaving the meat to stand, or rest, and ensures the meat develops and retains taste and tenderness.

8. to serve, slice thinly, pour over the cooking juices from the bottom of the pressure cooker and garnish with the spring onion.


1.


Posted in Uncategorized | Tagged , , , , , , , | 5 Comments

Squid in the pressure cooker? You bet!

I’ve made this delicious, rich sugo several times after discovering the recipe in Guy Grossi’s fantastic Italian cookbook My Italian Heart, but this was the first time I’d tried it in the pressure cooker. What a revelation – the squid turned out remarkably soft, and with only 15 minutes cooking, there was plenty time to let it rest and develop an even more intense flavour before our guests arrived for dinner.

Spaghetti con sugo di calamari (spaghetti with calamari sauce) (serves 10)
(This sauce lasts in the fridge for 3 days and can also be frozen)

1kg fresh calamari, cleaned and cut into 1cm x 5cm strips (ours was caught locally, apparently in line with sustainability protocols)
olive oil
2 cloves garlic, crushed
2 red chillies, chopped finely
handful fresh coriander, chopped finely
handful fresh parsley, chopped finely
1/2 cup tomato paste
2 tblspns plain flour
150 ml white wine
500ml fish stock (or water)
Spaghetti to serve

  1. Heat some olive oil and fry the onion, garlic and chilli until the onion is translucent.
  2. Add the herbs and fry for a few minutes.
  3. Add the tomato paste and flour and cook until the tomato paste darkens (often, by this point, the browning function on my electric pressure cooker has switched itself off, so I just add a bit of wine to get it going again.)
  4. Add the wine and let simmer for a few minutes, then add the stock or water (and pepper and salt as desired).
  5. Meanwhile, in a separate pan, fry the calamari in some olive oil for a couple of minutes (you’ll probably have to do it in 2 or 3 batches).
  6. Drain on paper towel, then add to the tomato mixture.
  7. Cook on low pressure for 15 minutes, using the slow release method to finish.
  8. Serve with cooked pasta. It’s pretty rich so one large dollop should be enough for each diner.
Posted in Uncategorized | Leave a comment

Lazy girl’s Sunday night pilaf

FullSizeRender

Nothing like getting home at 7.30, not knowing what we were going to eat but managing to have dinner on the table at 8…Thank you pressure cooker – and also to Steve for the home grown garlic and silver beet that I found on the bench!

Lazy girl’s Sunday night pilaff
(serves 6)

1kg chicken (or pork), cut into bite-sized pieces
3 cloves garlic, crushed
1 zucchini, chopped roughly
1/2 red capsicum (seeds and white removed) finely sliced
good quality olive oil (I’m a convert to Golden Creek extra virgin olive oil from South Gippsland)
1 1/2 cups basmati rice
pinch saffron threads (NOT the imitation garbage)
2 1/2 cups chicken stock (hot)
1 cup finely shredded silver beet

1. Fry the garlic in the olive oil, add the chicken, brown lightly and remove from the pan.

2. Lightly fry the zucchini (until sweating), add the saffron threads and rice.

3. Add a little more olive oil if necessary, and stir until the rice is coated with oil.

4. Return the chicken to the pan, add the chicken stock and cook on low pressure for 8 minutes.

5. Use the slow release method, quickly stir in the silver beet, season with pepper and salt and serve.

Posted in Uncategorized | Leave a comment

Quick pork curry

IMG_0322

This curry is a bit of a fiddle at the beginning but is worth the effort. Frying and blending the onions and spices took about ten minutes, and then it was just twenty minutes in the pressure cooker before it was ready. I had doubled the mixture so there would be something leftover for tomorrow, but no such luck…

(Of course, you could always use a commercial vindaloo paste, but where is the fun in that???)

1 kg pork shoulder, diced
2-3 dried chillies
2 tspns ground cumin seeds
tspn black peppercorns
1 tspn ground cardamon
1 stick cinnamon (broken up)
1 tspn mustard seeds
1 tblspn ground coriander
1 tspn turmeric
5 tblspns white vinegar
1 tblspn sugar
salt
100ml oil
2 onions, sliced
2.5cm knob ginger, minced
5 garlic cloves, minced

1. Mix the dry spices (chillies, cumin, cardamon, peppercorns, cinnamon, mustard seeds, coriander and turmeric) together and pound with a pestle and mortar.

2. Add vinegar, salt and sugar and set aside.

3. Fry the onions in some oil until crisp.

4. Remove the onions from the pan with a slatted spoon and put into the blender with 3 tblspns water and the spices. Puree.

5. Brown the pork in the remaining oil and remove from the frying pan.

6. Add the garlic and ginger to the pan and fry for a couple of minutes.

7. Put the meat, onion & spice puree, ginger and garlic into the pressure cooker with 2 cups of water.

8. Cook on high pressure for 2o minutes. Ideally, use the slow release method when finished.

9. Serve with boiled white rice.

Posted in Uncategorized | Leave a comment

Cauliflower soup – easy, cheap and very delicious

Cauliflower soup

Sorry I’ve been off-air recently: our home was struck by lightning and burnt down. Yes, we were shocked, too. Unfortunately my camera went up in smoke which is one excuse for not posting. I still haven’t replaced it, so you’ll have to put up with iPhone pics for a while!

Of course, one of the very first things I bought after the fire was a new pressure cooker! And I am so grateful for it: it gets used almost every single day, even more now that it is is winter.

This evening, I arrived home late but managed to get this delicious meal on the table within 12 minutes of stepping into the kitchen. I love soups – I can get all number of vegetables and legumes into people’s stomaches without them realising! And then there’s only the chopping board and the pressure cooker bowl to clean afterwards. Heaven 🙂

Cauliflower soup
(Serves 6)

1 onion, finely chopped
2 cloves garlic, minced
1 tablespoon butter or olive oil
1 cauliflower, broken into florets
4 small potatoes (peeled or unpeeled) chopped
1 can butter beans, drained
1.5 litres vegetable or chicken stock
large handful rocket, chopped
pepper and salt
1 cup milk or cream (optional)

1. Brown the onion and garlic in butter (or oil).

2. Add the potato and coat with the butter (or oil).

3. Add the cauliflower, canned beans and stock.

4. Cook on high pressure for 5 minutes.

5. Wait until the pressure subsides or use the quick release method.

6. Roughly blend the mixture with a Bamix, potato masher or using the blender. Don’t over blend unless you want a very thick soup. I like to have a few chunks of potato and most of the beans left whole.

7.  Add the rocket (it gives a lovely spicy flavour as well as adding a bit of colour).

8. If desired, add milk or cream, but it is really nice without. Season as desired.

Posted in Uncategorized | 2 Comments

Well, I’ll be skewered – salmon on a budget

Salmonskewers

Everyone knows that salmon is good for us. In fact, it’s one of the best-known sources of omega 3, an essential fatty acid that (as its name suggests) is necessary for health and wellbeing.

Only problem is, salmon is so expensive! At our local fish shop, salmon fillets are around $45 per kg. That makes feeding a family of 6 a pretty expensive exercise.

There is a way to put fresh salmon on the table, however, in a way that won’t blow the budget OR  make everyone feel they’re on starvation rations. It’s simple, cheap and also looks great on the table.

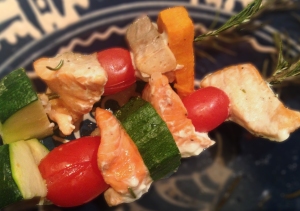
It’s salmon skewers.

I got the idea from our local fish shop that has started selling trays of ‘diced salmon’ for just $20/kg. My guess is that the chunks of salmon are the messy ends of the fillets that get trimmed off so that everything looks nice and neat and even. There’s nothing wrong with the fish, and it’s already cut into skewer-friendly chunks.

Of course, you could buy salmon fillets and chop them up yourself, happy in the knowledge that a little bit of fish will go a very long way.

A couple of added bonuses for this meal is that you can get a multitude of different veggies into your kids’  mouths, and the skewers are a visual treat – especially if you use rosemary stems, as I did. It’s a simple meal that packs a huge visual and omega 3 punch for a comparatively small amount of money.

Salmon skewers
(serves 6)

3 salmon fillets (or around 800gm of diced salmon)
3 cups diced vegetables eg red capsicum, sweet potato, zucchini, pumpkin
cherry tomatoes
12 bamboo skewers OR 15cm long rosemary stems*
1 lemon

1. If using bamboo skewers, soak them in some water beforehand for at least 15 minutes to reduce the risk of them burning.

2. Chop the salmon into large, bite-sized chunks.

3. Make sure the vegetables are cut into similar sized chunks to the salmon. The salmon will only take a few minutes to cook, so quickly zap or steam any veggies that will need more time, such as sweet potato and zucchini. You want them to be firm enough that they will keep their shape on the skewer.

4. Thread 3 chunks of salmon and 6 or 7 veggies onto each skewer in an alternating pattern.

5. Drizzle with lemon juice and cook in the oven at 180 degrees, or in a fry pan or on the BBQ, for a few minutes until the salmon starts to turn slightly pale on the outside.

6. Serve with a nice salad, couscous or rice.

* choose older, woody stems that will be firm enough to hold the salmon and veggies, and strip off all the leaves except for a nice tuft at one end.

Posted in Uncategorized | Leave a comment

The pearl in the oyster blade

photo[1]

Oyster blade (also known as flat iron steak or butler’s steak) is my favourite cut for slow cooking. It is super-flavoursome but can be tough because of the shoulder muscle it contains.

I adapted this recipe from one that I found in this month’s Inside Out magazine. If you want to use the pressure cooker for a quicker meal, I suggest using casserole meat or beef cheeks rather than oyster blade. Follow steps 1-3 and then pressure cook on high for 30 minutes.

To ensure you get real bang for your buck, try to resist the urge to serve this meal immediately (if you can, leave the cooked meat to sit in the fridge for a day or so). And also take the time to reduce the red wine – it will give you a much richer sauce.

Don’t make the salsa until the last minute, however – freshly blended, it’s a colour sensation!

Braised oyster blade with green herb salsa
(serves 6)

6 pieces oyster blade steak
2 onions, chopped finely
4 cloves garlic, minced
750 ml red wine
2 bay leaves
2l beef stock
flour for dusting
olive oil for frying

Green herb salsa
1 cup fresh parsley
1 cup fresh basil
1/2 cup mint
2 tbspn Dijon mustard
2 tbspn capers
2 anchovies (optional)
1/3 cup olive oil

1. Put the wine into a saucepan, simmer and reduce by half.

2. Cut each steak into two, dust with flour and brown.

3. Fry the onion and garlic.

4. Place the meat, onions and garlic into the slow cooker with the red wine, beef stock and bay leaves, making sure that all the meat is covered with liquid.

5. Cook on low for 8 hours (I like to put it on overnight).

6. Reheat and just before serving, prepare the salsa by putting all ingredients into a food processor and blending until smooth.

(if the gravy seems a bit thin, mix a tablespoon of flour with 1 cup of gravy and return to the pot to thicken)

7. Serve with soft or fried polenta OR mashed potato.

Posted in Uncategorized | Tagged , , , , , , , , , , , | Leave a comment